My Hobby Shrink Foil
Shrink wrap is one of those hobbies that surprises both young and old every time. You start with a simple drawing on a thin sheet of plastic, cut it out, and place it in the oven. For a moment, it seems as if everything is going wrong: the film curls up completely and moves in all directions. But a moment later, it flattens out again, and a sturdy mini-artwork emerges from the oven. That moment remains fun, no matter how often you see it.
Shrink wrap is so popular precisely because your own design transforms into something you can actually use. Make a cheerful keychain for a gym bag, a name tag for a backpack, a pair of earrings, a bracelet, or a personalized gift for grandma and grandpa. A beautiful drawing no longer has to disappear into a sketchbook but gets a permanent place.
Shrink wrap is also a hobby that requires few materials. This makes it ideal for a rainy afternoon, a children's party, a creative workshop, or a cozy crafting afternoon at the kitchen table. Children love seeing their own creations transform, and adults quickly discover how fun it is to make jewelry, accessories, and gifts.
What is shrink foil?
Shrink Foil is a special plastic sheet that shrinks when heated. During baking, the material shrinks to about a third of its original size, while simultaneously becoming much thicker and sturdier. The colors also often become more intense after baking, making your design stand out even more beautifully.
You might still know shrink film by the name Krimpy Dinky or Krimpie Dinkie. The technique has been around for years, but is still incredibly popular because you can vary endlessly with it.
You can draw on the foil using special shrink foil markers, colored pencils, or other suitable materials. Then, cut out the shape, optionally pre-make a hole for a keychain or necklace, and bake the figures according to the instructions on the packaging.
Why is shrink foil so much fun?
Shrink foil combines creativity with a touch of wonder. You come up with your own design, choose the colors, and then watch your drawing transform into a sturdy accessory. That element of surprise remains special every time.
In addition, it is a hobby that almost anyone can take up. Children draw their favorite animals, cars, flowers, or unicorns, while adults opt for stylish jewelry, name tags, or decorations.
Another advantage is that your projects are finished quickly. You don't have to wait days for something to dry. In no time, you will have a handmade gift or accessory in your hands.
Who is shrink foil suitable for?
Shrink wrap is suitable for anyone who enjoys being creative.
Children love transforming their own drawings into a keychain or hanger for their school bag. Parents discover how fun it is to create something together that is actually used afterwards. Grandparents, teachers, and after-school care supervisors also regularly choose shrink wrap because it is easy to explain and provides quick results.
Adult hobbyists, on the other hand, use shrink film for making jewelry, earrings, necklaces, bag charms, and small home decorations.
What do you need?
For your first project, you need surprisingly few materials.
A good start is a stack of Shrink Plastic Sheets A4. You can opt for transparent sheets or for a special version, such as shrink foil in gold and silver , with which you instantly give your designs a striking look.
To color your design, the Collall Krimpie Marker specially developed for this technique. Do you want to turn your design into a keychain? Then you can do that by using silver-colored keychains .
If you prefer making jewelry, you can combine the shrink film with cheerful emoji beads , and an extensive bead set in a butterfly box or colorful macramé cord in neon colors.
Do you prefer to start with a complete set? Then the Shrink Foil Accessories Starter Set is ideal for getting to know the technique. You can also choose the Shrink Foil Jewelry and Accessories Hobby Set , the Friendship Necklaces Mini Hobby Set or the Shrink Foil Bracelets Mini Hobby Set .
For children who like to wear flowers and butterflies, there is also the Shrink Foil Bracelets with Butterflies and Flowers Set. .
Which markers and pencils can you use to color shrink film?
You can use various drawing materials for shrink film, such as colored pencils, permanent markers, alcohol markers, and waterproof fineliners from Uni Pin. However, the best result depends on whether the shrink film has a smooth or matte side.
Colored Pencils: Colored pencils are one of the most popular materials for shrink film. They apply color easily to the matte side, allowing you to create beautiful color transitions. After shrinking, the colors often become more intense.
Permanent markers: Permanent markers, such as alcohol markers or waterproof markers, are ideal for crisp lines and bright colors. They work especially well on the smooth side of the shrink wrap.
Alcoholmarkers: Alcohol markers produce deep, even colors and are perfect for illustrations and manga-style designs. Preferably use them on the smooth side of the shrink film and let the ink dry thoroughly before placing the film in the oven.
Fineliners: Waterproof fineliners are ideal for outlines, small details, and hand lettering. Always check if the ink is permanent so that the lines remain nice and sharp as they shrink.
Work slowly and color your design slightly lighter than you want the final result to be. After baking, the colors usually become deeper and more intense. Also, keep in mind that small details will become even smaller after shrinking. Large, clear shapes therefore often yield the best results, especially when children are involved.
From drawing to lasting memory
One of the nicest features of shrink film is that a simple children's drawing suddenly becomes much more than a craft project.
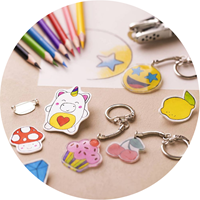
A dinosaur turns into a keychain for a gym bag. A little heart becomes a pendant on a necklace. A cheerful flower finds a spot on a gift for Grandma. In this way, beautiful drawings are not only preserved, but are actually used.
A shrink wrap hanger becomes surprisingly thick, hard, and strong after baking. This makes it very suitable for daily use on a gym bag, backpack, jacket, or keyring. Children recognize their own belongings faster this way. That saves arguments at school about whose gym bag actually belongs to whom.
That is exactly why shrink wrap is such a fun gift. A homemade keychain or name tag is personal, practical, and made with love. Children are proud when they can say: “I made that myself!”
Below, you can read step-by-step how to work with shrink wrap, discover handy tips, get inspiration for new projects, and find answers to frequently asked questions.
Shrink foil step by step
Working with shrink foil is not difficult, but it is important to follow the steps in the correct order. In particular, the hole for a hanger must be made before heating. After shrinking, the film is thick and hard.
Step 1: Choose or create a design
First, decide what you want to make. You can draw a figure yourself or trace an image. Think of an animal, flower, rainbow, football, car, name, or a simple symbol. Especially for a first project, large, clear shapes work best.
You can also print out an image and place it under transparent shrink film. This way, children can easily trace a figure and then color it in themselves. Keep in mind that your design will shrink considerably during baking. Therefore, draw it larger than the size you ultimately want.
Step 2: Draw and color the foil
Draw the design on the designated side of the Shrink Plastic Sheets A4 and color it in Collall Krimpie Marker, colored pencils, or other suitable drawing materials. Always check the instructions on the packaging of the film and the markers used.
Do not make the colors unnecessarily dark. During shrinkage, the color pigments move closer together, causing the colors to naturally become more intense. Small details and thin lines also become much smaller. Therefore, it is better to opt for clear lines and recognizable shapes.
Step 3: Cut out the figure
Carefully cut out the design. You can cut precisely along the outline or leave a small transparent edge around the figure. Optionally, round off any sharp corners slightly. This feels nicer when using the finished result as a keychain, piece of jewelry, or bag charm.
With young children, an adult can help cut out small parts.
Step 4: Make a hole beforehand
Do you want to turn your design into a keychain, necklace, bracelet, or bag charm? Then make a hole with CC Hole Punch 1.5 mm the before baking. After shrinking, the film is much thicker and sturdier, making it difficult to make a hole.
Do not place the hole too close to the edge. This reduces the risk of the material tearing during use. Additionally, keep in mind that the hole will shrink along with it.
Step 5: Bake the shrink wrap
Preheat the oven according to the temperature and baking time stated on the packaging of your shrink wrap. The correct settings vary by type and brand. Therefore, always follow the product instructions.
Place the cut-out figures separately on a baking sheet lined with parchment paper. During heating, the foil will initially move and curl up completely. This is part of the process. A moment later, the figure will flatten out again on its own, and the shrinking is complete.
Caution: always have an adult operate the oven. The baking sheet and the shrink wrap are very hot after baking. Carefully remove the figures from the oven and let them cool completely before handling or processing them further.
Step 6: Finish your design
After cooling, the figure is smaller, thicker, and surprisingly strong. Now attach a sleutelring, cord or jewelry component. You can make your creation extra personal by combining it with emoji-kralen, een kralenset of kleurrijk macramékoord.
What can you make with shrink foil?
A keychain is perhaps the best-known project using shrink film. And for good reason: it is sturdy, practical, and can be made entirely to your own taste. Hang it on a keyring, jacket zipper, backpack, or gym bag. This helps children recognize their own belongings much faster, and they find it extra fun to be able to say: "I made that myself!"
Shrink film is also perfect for personalized gifts. Make a pendant with a child's drawing for grandpa and grandma, a heart for Mother's Day, a keychain for Father's Day, or a small thank-you gift for a teacher. Shrink film is also a great success as an activity during a children's party or creative afternoon.
Other fun ideas are:
- - Brooches and buttons
- - Bracelets and friendship necklaces
- - Earrings and necklaces
- - Bag hangers and zipper pulls
- - Name labels for school
- - Refrigerator magnets
- - Christmas ornaments
- - Gift tags
- - Small decorations for cards or gifts
Children who love vehicles can even make cars using buttons as wheels. Prefer something colorful? Then butterflies, flowers, unicorns, mermaids, or rainbows are always a fun choice.
Tip from Sarah from iHobby
The same thing happens every time here at home. As soon as the shrink wrap goes into the oven, one of the children calls out: " Mom! It's going wrong!" You see, the wrap curls up completely and moves across the baking paper. And a few seconds later, it's suddenly lying completely flat again. That remains a special moment every single time.
By now, I also look at drawings very differently. A beautiful drawing no longer has to disappear into a folder or drawer. We turn it into a keychain, Christmas ornament, or personalized gift.
And honestly... those keychains are just incredibly handy. Children recognize their belongings much faster by a gym bag, backpack, or jacket. That saves arguments at school about whose gym bag actually belongs to whom.
Tips from iHobby
Always test new drawing material on a small piece of shrink film first. Not every pen or marker reacts the same way to the heat of the oven. This way, you avoid surprises and can be sure that your design remains sharp and colorful after shrinking.
Unsure about the size? Then make a test design first. This way, you can see exactly how much your shrink film shrinks and how the colors look after baking. After that, you can easily make the rest of your designs in the correct size.
Don't have an oven? You can also shrink shrink foil with a heat gun. Use a heat-resistant bowl or silicone mold and move the heat gun gently over the film so that it heats evenly. An oven usually gives the most even result, but with a little practice, you can also achieve beautiful results with a heat gun.
Tips for beginners
- Start with a simple design such as a heart, flower, animal, or name tag.
- Draw your design larger than the final size.
- Use clear lines and not too many small details.
- Place the figures separately on the baking sheet so that they do not touch each other while curling.
- Save leftover shrink wrap. Small pieces are ideal for charms, initials, or mini pendants.
- By all means, let children draw and color, but always have an adult operate the oven.
Common mistakes
Forgot the hole
This is probably the most common mistake with shrink wrap. Do you want to make a keychain, necklace, or bag charm? Then don't forget to make a hole with the CC Hole Punch 1.5 mm before baking. After shrinking, the film is much thicker and sturdier.
Use letters that are too small
Letters and fine details shrink along with the baking. A name that is clearly legible beforehand can become very small after baking. Therefore, it is better to use slightly larger letters and clear shapes.
Color too dark
The colors often become more intense during firing. By coloring slightly lighter, small details remain more visible in the final result.
Removing the foil from the oven too early
During baking, the foil will initially curl up completely. This is normal. Do not remove the figures from the oven immediately, but wait until they are nice and flat again. Always follow the instructions on the packaging of your shrink film.
Touching the hot foil
The baking sheet and the shrink wrap are very hot immediately after baking. Have an adult operate the oven and allow the figures to cool completely before further processing.
More inspiration with shrink foil
Looking for fun examples? Then take a look at these creative projects on iHobby as well:
FAQ: Frequently asked questions about shrink foil
1. How much smaller does shrink foil get?
Shrink film usually shrinks to about one-third of its original size during baking. The exact shrinkage may vary per product. If in doubt, make a test design first and always follow the instructions on the packaging.
2. At what temperature should shrink wrap be placed in the oven?
That varies by type and brand. Therefore, always use the temperature and baking time stated on the packaging of your shrink wrap.
3. Why does shrink foil curl during baking?
At iHobby, we regularly receive questions about why shrink wrap curls up so extremely during baking. Fortunately, this is part of the normal shrinking process. Almost every beginner thinks it has failed the first time. During heating, the material contracts, causing it to curl up first and then flatten out again on its own.
4. Is shrink foil suitable for children?
Yes, shrink foil is a fun hobby to do with children. They can draw, color, and come up with designs themselves. Always have an adult operate the oven and remove the hot baking sheet.
5. Can I trace an image?
Absolutely. Place a printed image under transparent shrink film and simply trace over it. This also makes shrink film very suitable for beginner hobbyists and children.
6. Is a shrink wrap keychain strong?
After baking, shrink wrap becomes surprisingly thick and sturdy. This makes it very suitable for keychains, bag charms, and name tags that are used daily.
Get started with shrink wrap yourself
You don't need an extensive collection of materials for shrink film. With a sheet of shrink foil, the Collall Krimpie Marker, scissors, and some baking paper, you can quickly make your first project. Do you want to make a keychain, necklace, or bracelet? Then don't forget to make a hole with the CC Hole Punch 1.5 mm before baking.
Not sure where to start? Then the Shrink Foil Accessories Starter Set is ideal for learning the technique step by step. Do you want to make jewelry right away? Then choose the Shrink Foil Jewelry and Accessories Hobby Set , the Friendship Necklaces Mini Hobby Set , the Shrink Foil Bracelets Mini Hobby Set or the Shrink Foil Bracelets with Butterflies and Flowers Set. .
Would you rather work entirely from your own ideas? Then choose the loose shrink foil or the deluxe shrink foil in gold and silver and combine it keychains , cheerful emoji beads , a bead set or macramé cord in neon colors. This way, you can create personalized jewelry, original gifts, and sturdy keychains that children will instantly recognize as their jacket, backpack, or gym bag. Before you know it, a simple drawing turns into a lasting memory that goes with you every day.