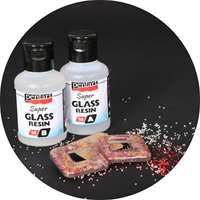
Getting Started with Epoxy Resin: everything about epoxy resin casting
Epoxy Resin is a crystal-clear epoxy casting resin that allows you to easily create the most beautiful creative projects. From stylish coasters and jewelry to home decor, keychains, and decorative bowls: with resin, you give every creation a luxurious, glossy look. Because the resin cures completely transparent, you can also incorporate pigments, glitter, gold leaf, or dried flowers for a unique end result.
Resin casting has become hugely popular among creative hobbyists in recent years. And that is not surprising. You need relatively few materials, the possibilities are endless, and every project is different. Whether you are working with epoxy resin for the first time or already have experience with creative hobbies such as Jesmonite or candle making: with Super Glass Resin, you will quickly discover how fun and versatile this technique is.
On this page, we explain step by step how Super Glass Resin works, which materials you need, and provide handy tips to achieve a beautiful result immediately.
What is Epoxy Resin?
Epoxy resin, epoxy casting resin, and resin are often used interchangeably. In the creative hobby world, we usually mean the same thing: a two-component resin consisting of a resin and a hardener. Mixing these two components creates a liquid substance that hardens over time into a hard, transparent finish.
After curing, a hard, smooth, and durable layer with a luxurious appearance is formed. This makes Epoxy Resin perfect for decorative projects where you want to create a transparent or glossy effect.
The material is popular because it:
- dries crystal clear;
- is easy to color with pigments;
- combines perfectly with glitter, dried flowers and gold leaf;
- ist für Silikonformen geeignet;
- gives a professional, glass-like finish.
What do you need to work with Epoxy Resin?
Before you start, it is nice to lay out all the materials. This way, you can work calmly and avoid having to search for tools while mixing.
The base consists of:
- Super Glass Resin or Epoxy Resin – for example CC Transparent Bio-resin Clear 2x150 ml .
- Silicone molds – specifically suitable for epoxy casting resin.
- Mixing cups
- Stirring sticks
- Disposable gloves
- Color pigments – for transparent, opaque, or marble-like effects.
- Glitter or decorative materials – for extra sparkle in your creations.
- Paper towels – handy while working.
- A flat and dust-free workspace
Super Glass Resin dries completely transparent on its own. Do you want to give your creation a unique look? Then add special resin pigments or glitters. With these, you can easily create soft pastel shades, deep colors, metallic effects, or a subtle shimmer.
Also fun for children
Do you want to introduce children to resin in a safe way? Then the Sentosphere Atelier Resin Casting is a responsible choice. This complete DIY kit has been specially developed for young creatives and contains everything needed to easily get acquainted with resin casting.
Working with Epoxy Resin Step by Step
Working with resin is not difficult at all when you follow the right steps. Take your time and work safely and accurately. Avoid skin contact and wear gloves if necessary. This will ensure you get the best results.
Step 1 – Prepare your workspace
Make sure all materials are ready before you begin. Protect your work surface and preferably work in a well-ventilated area.
Step 2 – Mix the resin
Mix the resin and hardener according to the mixing ratio indicated on the packaging. Stir gently for a few minutes so that both components mix well together. Try not to stir too quickly, as this creates an unnecessary number of air bubbles.
Step 3 – Add color or decoration
Now it is time to give your creation a unique look. For example, add pigment, glitter, gold leaf, alcohol ink, or dried flowers. Gently mix this into the resin until the color is evenly distributed.
Step 4 – Pour the resin into the mold
Slowly pour the resin into the silicone mold. By pouring slowly, you minimize air bubbles and ensure the resin spreads smoothly over the shape.
Step 5 – Remove air bubbles
Do you see small air bubbles after pouring? You can carefully remove these with a heat tool or by briefly moving a gas lighter over the surface. Always do this carefully so that the resin does not get too hot.
Step 6 – Let the resin cure
Next, let the resin fully cure according to the drying time on the packaging. Place your project in a dust-free location while it dries and touch the mold as little as possible.
Do you want to see the entire process step by step? Then check out our extensive blog about Super Glass Resin, where we demonstrate the technique in detail and provide extra tips for a perfect end result.
What can you make with Epoxy Resin?
Epoxy Resin is an incredibly versatile material. Because the resin cures crystal clear, you can endlessly vary with colors, decorations, and shapes. Every creation takes on a luxurious look and is completely unique.
Popular projects include:
- - Coasters
- - Jewelry
- - Earrings
- - Keychains
- - Trays
- - Decorative bowls
- - Candle holders
- - Bookmarks
- - Christmas ornaments
- - Home decor
By working with pigments, glitter, gold leaf, or dried flowers, you give every creation a unique look. This way, you can easily make a personalized gift or a stylish home accessory that perfectly matches your interior.
Which pigments can you use to color resin?
One of the nicest features of resin is that you can easily color and decorate it. With special resin pigments you give your creations exactly the look you want. From soft pastel shades and transparent colors to metallic effects or a marble look: the possibilities are endless.
For epoxy resin, always use colorants specifically developed for resin. These mix well with the resin and ensure that the resin cures properly. Therefore, do not use paint or colorants that are not suitable for epoxy resin, as this can disrupt the curing process.
Popular pigments and decorative materials are:
- Mica powder – creates a pearlescent or metallic effect.
- Resin color pigments – available in transparent and opaque colors.
- Alcohol ink – ideal for colorful swirl and marble effects.
- Glitters – for a sparkling or festive result.
- Gold leaf and foil flakes – create a luxurious look.
- Dried flowers – perfect for jewelry, coasters, and home decor.
Always add pigments little by little. A small amount is often sufficient to achieve a beautiful color. If you use too much pigment, it can affect the curing of the resin. Therefore, always read the recommended dosage on the pigment packaging.
Is every silicone mold suitable for Epoxy Resin casting?
No, not every silicone mold is suitable for epoxy casting resin. For a beautiful and safe end result, it is preferable to use silicone molds that have been specifically developed for resin or epoxy.
These molds usually have a smooth or high-gloss finish. As a result, your resin creation comes out of the mold easily after curing and immediately acquires a beautiful, glossy finish.
The quality of the silicone also plays an important role. During curing, heat is generated by the chemical reaction of the resin. High-quality silicone molds can withstand this. Cheap silicone molds or, for example, simple ice cube trays can deform or even be damaged as a result.
Therefore, it is better to invest directly in a good silicone mold. You will notice that your creations come out of the mold looking better, and the molds also last much longer.
How much resin do you need?
The amount of resin that needs to be lifted depends on the size and depth of the silicone molds of the project being made. Small molds for earrings or keychains, for example, often lift only a few milliliters of resin, whereas you use significantly more resin for coasters, tray dishes, or small bowls.
Unsure about the correct amount? First, fill the silicone mold with water and then pour it into a measuring cup. The number of milliliters of water roughly corresponds to the amount of resin you need. However, make sure the mold is completely dry before you start working with the resin.
It is better to mix slightly more resin than just too little. However, take into account the mixing ratio of the resin and hardener as indicated on the packaging. Also, do not mix unnecessarily large quantities at once. Resin has a limited working time and begins to cure slowly after mixing.
Are you working with pigments, glitter, dried flowers, or other decorative materials? Then keep in mind that these also take up space in the mold. In that case, you often need slightly less resin than when you fill the mold completely with resin.
Tip from Sarah from iHobby
Want to work with Super Glass Resin for the first time? Then start with a pair of simple earrings. For this, I personally like to use a geometric silicone earring mold. You will immediately learn how resin behaves, can experiment with color pigments and glitters, and achieve a beautiful end result in a short time.
Small projects are ideal for mastering the technique before you start making larger home decorations or trays.
What is the difference between epoxy resin and UV resin?
Epoxy resin and UV resin are similar, but differ in use and curing.Epoxy resin It consists of two components: a resin and a hardener. You mix these in the correct ratio before use. The resin then cures on its own. Depending on the product, this usually takes 12 to 48 hours.
UV resin It consists of a single component and does not need to be mixed. The resin only hardens when exposed to a UV lamp or direct sunlight. As a result, UV resin is often fully cured within just a few minutes.
For larger projects, such as coasters, small bowls, trays, or home decor, epoxy resin is usually the best choice. The resin flows nicely, is suitable for thicker casting layers, and provides a strong, crystal-clear finish.
UV resin is primarily used for small projects, such as jewelry, charms, keychains, and filling small silicone molds. Because the resin cures so quickly, you can continue working fast. However, UV resin is less suitable for thick casting layers, because UV light does not penetrate deep enough to allow the resin to cure properly everywhere.
Do you want to just start with resin casting and create larger decorative projects? Then isepoxy resin, such as Super Glass Resin, is usually the best choice. If you mainly make small jewelry or want to work quickly, then UV resin is a handy alternative.
Common beginner mistakes
Everyone makes mistakes when working with resin for the first time. Fortunately, most are easy to prevent.
- - Durch zu schnelles Rühren bilden sich viele Luftblasen.
- - Not adhering properly to the mixing ratio of resin and hardener.
- - Adding too much color pigment, causing the resin to cure less well.
- - Working in a cold room, causing curing to take longer.
- - Removing a project from the silicone mold too early.
- - Working with silicone molds that are not suitable for epoxy resin.
Take your time with every step. Resin is not a technique where speed is important; working accurately ultimately yields the best result.
FAQ: Frequently Asked Questions about Super Glass Resin
1. Is Super Glass Resin suitable for beginners?
Yes. When you work slowly and adhere to the correct mixing ratio, Super Glass Resin is a great technique for beginners to start with, too.
2. Can I color Super Glass Resin?
Certainly. Use special resin pigments or resin dyes for this. Glitters, metallic pigments, gold leaf, and alcohol ink are also popular for creating unique effects.
3. Why do air bubbles form?
Air bubbles usually form because the resin is stirred too quickly. Therefore, mix gently and carefully remove any air bubbles after pouring with a heat tool or gas lighter.
4. Can I incorporate dried flowers into resin?
Yes, dried flowers are actually one of the most popular decorations to incorporate into resin. Just make sure the flowers are completely dry before you embed them in the resin.
5. How long does Super Glass Resin need to cure?
The curing time varies by product. Therefore, always follow the instructions on the packaging and allow the resin sufficient time to fully cure before removing your creation from the mold.
6. Can I combine multiple colors?
Yes. By combining different resin pigments or glitters, you create beautiful marble, swirl, or transparent effects. It is precisely the experimentation with color that makes every resin creation unique.
Start with Super Glass Resin yourself?
Can't wait to create the most beautiful resin creations yourself? At iHobby, you will find everything you need to get started right away. From Super Glass Resin and epoxy casting resin to silicone molds, color pigments, and Pentart colored foil flakes. With these, you give every creation a unique look and easily make jewelry, coasters, home decor, or other decorative projects.
Are you looking for even more inspiration? Then also check out our step-by-step blog about Super Glass Resin. Here we show you how to create the most beautiful creations using resin, pigments, foil flakes, and silicone molds. Get inspired and discover how versatile working with Super Glass Resin is!